
Here are the stitches shown below.
I hope to add more in the future. Stay tuned!
------------------------------------------------------------------
Back Stitch
Lazy Daisy and Chain Stitch
Couching Stitch
Fly Stitch
Straight Stitch
Stem Stitch
Satin Stitch or Shaded Stitch
Button hole or Blanket Stitch
Split Stitch
French Knot
Open Picot Stitch
Star Stitch
Wrapped Stitches Explained
Bullion Knots See this Video Tutorial- NeedleNThread by Mary Corbet She has the clearest, most understandable video tutorials for any stitch you would like to try. This is where I learned how to stitch! See her U-Tube Channel, Needle N Thread for a Full List of Stitches.
------------------------------------------------------------------
My Favorite Embroidery Stitches
I use these stitches on most every project I do.
I'll be adding more as I learn for my sampler project.
You can follow the pictures below as most of these stitches are easy. However, if you are a beginner or a visual learner, I highly recommend Mary Corbets stitch video tutorials. Her website, NeedleNThread is here. Find her stitch videos here.
I just ran across Sublime Stitching Website. Sooooo cute and very informative. She is one of my stitch heroes. These very generous and talented artist inspired me to take up embroidery. I'll be forever grateful. Go take a look at her great How To collection of basic stitches and how she uses them in a lovely collaboration of vintage and modern design.
The Back Stitch

The lovely, lowly, irreplaceable back stitch. Use this stitch to outline, letter, trace a pattern or take it to the next level and weave some yarn in and out of it's stitches. Its easy and neat. With some practice and a few tips, you'll look like a pro in no time at all.

1. Make a knot at the end of your embroidery thread and bring your first stitch up from the wrong side of the fabric.
Tip- (If you want to keep your line very straight, you can draw a very faint line with pencil, or use a marker that disappears in time or with a splash of water.)

2. As in the name, the back stitch, your stitches start behind and go forward. Insert your need above or in front of where your needle emerged. In one motion, bring the tip of the needle down and up through your line, heading forward, in the direction of your stitches. Gently pull the thread through. If you keep your stitches small, you can go around curves easily and smoothly. If your stitches are too long, they may snag, this is more true of embroidered objects that are functional, such as a pincushion.
Tip- Keep your tension uniform from stitch to stitch. Don't pull it tight. If you leave just a tiny bit slack, you can give your fabric a gentle tug. This will even out your stitches automatically.

3. Simply continue stitching as in step 2. Keep moving down your line until you are finished. When you get to the end of your line, bring the needle to the back of your project. Simple weave the end under a near-by stitch. You can then create a knot at the back. If I am making a functional item, I always knot. If I am creating something decorative, I may just weave the end through a few more stitches. This enables you to keep your project from looking bumpy or thick. You can also replace the knot with some fray stopping product or washable fabric glue.
You can wrap a back stitch to make it look thicker, add secondary colors or just add a decorative touch.

--------------------------------------------------
The Chain or Lazy Daisy Stitch

The chain stitch is often called the lazy daisy stitch. One stitch in itself creates a petal or leaf like shape. If you continue one stitch after another, you will get a chain stitch. I like to use this stitch when I need a nice wide line. You can use a lot of variance on where the needle goes in and to alter the size of the chain. I use it to place petals around a circle shape to make a flower. Check out the petals and leaves on the flowers on the apple below.


1. This stitch is so fast and easy. Simply come up and go down in the same spot. The trick is to create a loop to make each chain or petal. First come up with your needle. Then, in one motion bring the needle down into the same hole and then up through the loop you created. Pull through gently, but not firmly. The looser the stitch, the larger the loop will be.

2. The step shows the first completed stitch of the chain.

3. This image shows the beginning of the next stitch. Simple continue this same stitch to create a line of chain stitches.
To create a single petal or lazy daisy stitch, just come down over the loop to complete the petal shape. Add a bunch of these in a group with the pointed end in the middle and the loops facing to the outside. You'll have the perfect daisy! It also makes great little leaves. I use this stitch over and over again. Its adorable!

--------------------------------------------------
The Fly Stitch

--------------------------------------------------
The Couching Stitch

The couching stitch secures thread, yarn, ribbon or strips of fabric down onto the embroidered surface. It can be done in regularly spaced stitches, or mix them up to create a special pattern to enhance your yarn.

1. I think it is helpful to pin down the yarn you are couching. You can also use a glue stick on ribbon or simply hold the yarn down as you go.

2. Come up from the wrong side of the fabric near the yarn you are couching.

3. Insert the needle down into the fabric just on the other side of the yarn. Then pull through gently, but not tightly, unless you would like the pinch the yarn down to the fabric. There are a number of effects you can achieve with couching. Below is another way to couch yarn. I have seen lovely examples of couching using multiple strands of embroidery thread.
--------------------------------------------------
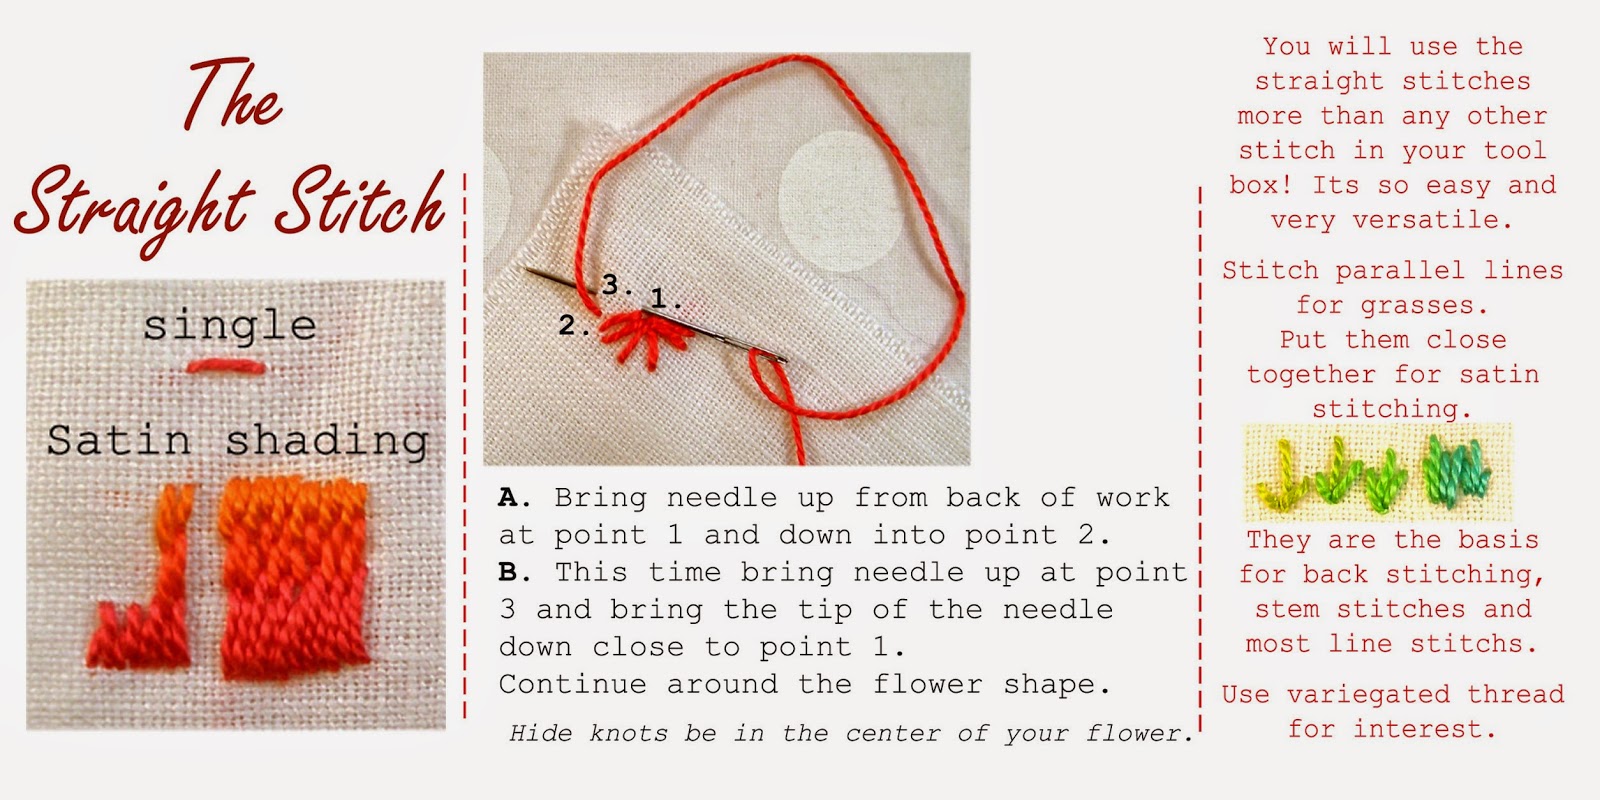
The Straight Stitch
--------------------------------------------------
The Stem Stitch

--------------------------------------------------
The Satin Stitch

I love the satin stitch. I use it when I want to thread paint. It is rich and luscious. You can create your own image or satin stitch over a patterned fabric. It is similar to crewel work. If you add some stitches to the area you plan on satin stitching, your final stitches will be raised. This stitch is easy and allows for a lot of personal interpretation.

1. I am working over split stitches as this is the traditional method of satin stitching. It raises the edges up slightly, giving a more padded look to the final stitch. You can satin stitch without the split stitch. To begin, bring your needle up just to the outside of and very close to the split stitch.

2. Insert the needle on the outside of the opposite line of stitching. I am sorry my image is the completed stitch. Step 3 is clearer and really the same as step 2.

3. All satin stitches are basically the same as show here. Insert the needle on the outside of one line of split stitches and come up on the other side of the other line of split stitches. Very easy and a quick way to completely fill in areas of color. I recommend that your stitches are no longer than 1/4 inch or they may snag, especially on functional items. To fill in larger areas, follow the instructions below for shading stitches.

Shading Stitches are staggered satin stitches. You can use this stitch in one color to fill in a large area of color, or you can use different colors in different shades to produce a shaded area. The above image is how I use embroidery to fill in areas of color on a printed piece of cotton fabric.

1. Shading stitches are the same as satin stitches, only shorter. Each stitch you take should vary in length from the stitch next to it. This will give a softer variance in colors, as if the colors are blended.


2.When you come up to begin the next stitch, try to place this stitch between the previous stitches. This will give you even more of a blended appearance from one color to the next. You will see a lot of color changes and blended colors on the owl in the top image.
--------------------------------------------------
The Buttonhole or Blanket Stitch
Needle Case inspired by Sue Spargo. Created with recycled wool, flannel and felt.

The buttonhole stitch is used everywhere in today's embroideries. The buttonhole stitch is a close variation of the blanket stitch. It give your project vintage charm, it covers and protects edges from fraying, it joins one fabric to another. Its called buttonhole because when the stitches are placed very near to each other, a buttonhole can be created. Most fiber artists use it as a decorative finish, placing a space in between each stitch. You can vary the length of the stitches alternately to create a different look. I like to add chain stitch leaves and sometimes french knots to the tips of each stitch to further embellish the edge. There are so many possibilities to take this stitch and any other to new and exciting places. What will you do with your stitches?

1. Bring the thread up from the back of your project. (The next stitch will begin to the right.)

2. Move to the right and bring the needle up from the back. The tip of the needle must cover the thread from where the first stitch emerged. Pull the thread through gently.

3. Continue as in step 2. Keep bringing the needle from back to front. Pull through and bring the next stitch over and from the back again.
If you are not finishing the edge, draw 2 parallel lines to mark where your stitch will go. One line will be where the needle will go into the fabric and emerge from the second line. Simple repeat that stitch to complete your design.
This pincushion uses the buttonhole/blanket stitch to join on piece of wool to the other. I added a variety of embellishments to the point of each buttonhole stitch. I love how it elevates a simple stitch into something charming and full of life.

--------------------------------------------------
The Split Stitch

The split stitch is used much like the back stitch. It gives an even, continuous line to your project. I think its rather tedious, but it is used to create a lovely satin stitch, which is a stitch I love, so here it is for you to add to your embroidery repertoire.

1. Come up from the wrong side of your fabric. The top line is a completed split stitch. The lower line is how it's made.

2. Go back down the same length you might use for a back stitch. If you create small stitches, you can turn corners easily. Longer stitches can be used for the preparation of a satin stitch or when creating a straight line of stitching.

3. When you come back up with the needle, pierce the first stitch you created in the middle of the stitch.

4. Go back down to complete the second stitch. Your stitches should be as uniform as possible to create a smooth line of stitching. Simply repeat these steps to continue down the line of stitching.
The French Knot

The french knot is an easy and versatile stitch. Don't let it's diminutive size fool you. It adds a pop of color and drama to your project in one easy stitch. I used to shy away from the knot because it is easy to get a floppy, misshapen blob of thread. If you follow my little tip in steps 3-5, you can create a perfect knot every time. In case you are wondering why one stitch has 6 steps, well, hmmm. Just believe me. It's just one stitch with lots of twists and turns.

1. Bring the needle up from the wrong side of your fabric and pull the thread through completely.

2. Lay the needle down with the tip crossing over the spot where the needle emerged. Wind the thread around the tip 1, 2 or 3 times, depending on the size of the knot you want. The needle tip should remain close to the fabric. Give the thread a little tug to snug it up close to the fabric.

3. With care, drag the tip of the needle towards the place where the thread emerged and insert the tip of the needle into the fabric exactly where it came out. Don't pull the thread through just yet.Don't lose those twists! I sometimes keep them tight using my left hand, while manipulating the needle with my right hand. Seems awkward, but after a few knots, it will become second nature.

4. This is the step that insures a perfect knot every time. Keep hold of the thread in your left hand and give it a gentle tug.


Here are a few new stitches I've picked up while doing my sampler...
The Open Picot Petal Stitch

You will need a straight pin for this stitch, as well as your embroidery thread and needle. This stitch involves a simple weaving process. It's really very easy and I hope you add it to your stitch arsenal.
To begin, decide how wide and how long your petal will be.
Place a straight pin through the middle of the petal. The entry point of the pin will mark where the actual top of the petal will be. The bottom of the pin should come out below the bottom of the petal. This pin will stay in place through out the creation of the petal.
Bring the embroidery needle up on the far left side of the petal (a). Bring the thread over the top of the pin and enter the fabric at the right hand side of the petal base, (b).

The next step is really just one 3-part motion. Bring the needle and thread up from the middle of the bottom of the petal. Pull the thread up all the way out.
Then bring the thread over the pin and around from the left to the right side of the petal.
Without piercing the fabric or any of the base threads, wind the needle and thread around from the right. Weave the needle under, then over, then under the base threads. Pull the thread taught but not tight.

Here is a larger image of the weaving part of the stitch.

Now just bring the needle back around and weave from the left. This time you will go under, over and then under.
Pull the thread taut but not tight.

Continue weaving from alternating sides until the full petal is filled with woven stitches.

Once the petal is full, just bring the thread back to the back of the fabric and knot off.

Pull the pin out and your petal is finished!


This demo stitch is a bit loose. Its important to push the woven thread layers up every once in a while. Create enough woven layers to fill the petal up so it is rather firm. This will make the petal stand up off of the base fabric. If you stitches are kind of wonky, just give the petal some gentle tugs up and out until the weaves are even and equal. This is a good stitch to practice often. The petals get better as you go along.
There is a variation to this stitch called the Closed Picot Stitch. To create that stitch you simple place all of the stitches at the base of the petal close together. This creates a stitch that is skinny at the top and bottom with a bit of a flare in the middle. It would make a great daisy stitch or a lovely leaf.
-----------------------------------------------------
The Star Stitch

This stitch is easy because it is logical. You can probably figure it out without a tutorial, but because it is part of another tutorial, I'll go through the stages. I added some stabilizing stitches in the above example, only because the metallic thread I used seemed to need some help on this floppy recycled fabric. I added french knots in the above example as well. The moon is just some satin stitches over a back stitch outline. Easy peasy.
First, knot your thread and mark where your star will be stitched. I used a pencil but you can free hand it or use a disappearing marker or chalk pencil if you like.

Step one- come up on one of the spokes of the star.

Step two- go back down in the spoke directly opposite the spoke you came up in. Aim the needle towards the first spoke to the left and point your needle down through that mark.

Step three- bring the needle up through the next stitch (from the top) and back down into the very opposite spot on the star (bottom). Basically, you will just be tracing the line with your thread.

Step four- you will just be repeating the last step over again, just moving to the next stitch. Come up through the top of the star and go down through the bottom of the star and move one spot over for your next stitch. I'll just show you the next few stitches that illustrate what I mean.


You are finished!

If you want to add some stitches to the center,just come up through the middle on one side of you center stitches and come back down on the other side. Repeat if needed. If you decide to weave a ribbon through the spokes later, to make a rose, you will need to stitch the center threads down.
When creating a ribbon rose, the star stitch is usually not used, but it will do in a pinch. I don't think the embroidery gods would get too upset if you used this stitch in a pinch.


I can envision this with some pretty stitch combinations to create flowers. You can add as many spokes or petals as you like. Or, add a flurry of french knots all around the top of the star stitch to suggest a dandelion or allium. I have seen this stitch as an empty space filler with sead stitches. It adds a touch of whimsy to your work. Now try it out on your sampler project!
Wrapped Stitches-
If you see a notation to wrap a stitch, it is really quite easy.
Come up from the back of your work right next to the stitch you need to wrap.
If you are wrapping a back stitch, all you need to do is to wrap your floss around each stitch, without going back into the fabric.
Here is an example

You can wrap entire chain stitches, or just wrap one side in one color and the other side in another for a folksy twist! I find myself wrapping stitches a lot, especially when I am using only two strands of floss. Sometimes I just want to go big!
11 comments:
Thank you so much for this wonderful tutorial!
This is amazing, thank you for the colorful illustrations! :)
Your tutorials and illustrations are perfect for someone like me who doesn't know how to embroider. I can't wait to get started. Yea for you.
In the context of embroidery, an embroidery stitch means one or more stitches that are always executed in the same way, forming a figure. Embroidery stitches are also called stitches for short.
Silk Digitizing
ESTA MUY LINDO!!!!
than you for your clear instructiosn..
i like them much
regina drumond
I think the things you covered through the post are quiet impressive, good job and great efforts. I found it very interesting and enjoyed reading all of it. Sportswear decorating Calgary Screen printing in Calgary Alberta
Thank you. These are some great stitching tutorials.
Regards from Absolute Digitizing
Thanks so much!!! Will do an small sampler . . . so well explained!!
you have make gorgeous design and I have deeply read your article and this is really an amazing post and you have described everything about embroidery with efficiency.
Embroidery Digitizing
white uniform dresses
Post a Comment